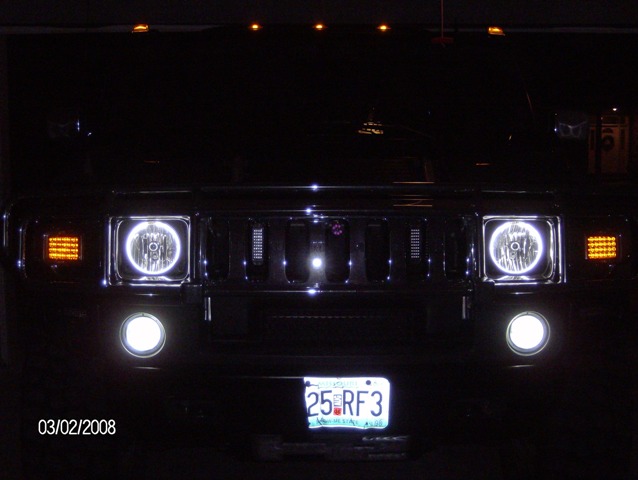
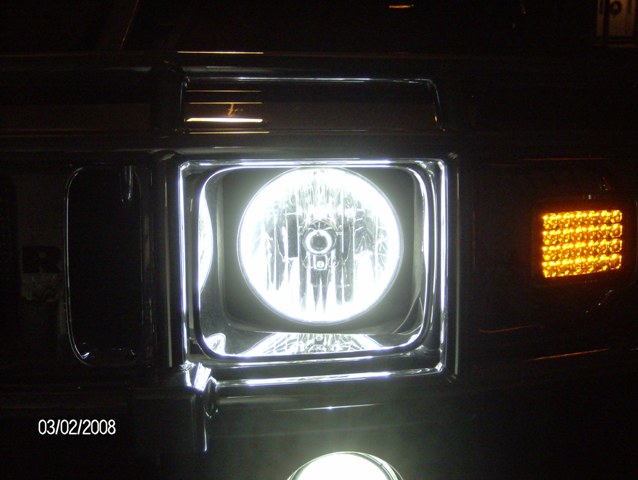
I have had a few questions about the Install of the Halo's so I thought I would post the how to here. I know some other owners out there have them and if you have any input I will greatly appreciate it.
Sorry for the novel, but the procedure is not difficult, I am just very thorough. Takes more time and patience than anything else. I would give it 2 out of 5 on difficulty, and I am not a mechanic or electrician. If this still does not sound like something you can do, Advance Automotive Motorsports will do it for you if you send them your Globes.
Parts Needed:
Oven
Oven Mitts
Windshield Adhesive or Silicone: 4 bucks at AutoZone
Open ended Wrenches, or Sockets
Flat Screwdriver
Solder gun
Solder
Electrical tape
Parts That enhance or make easier:
Vice grips, or clamps to hold pressure on globe
Paint Pen: 3 bucks at Wal-Mart
Flash Light
Lume: 2 bucks at Wal-Mart
I made the mistake of not taking photos of install, but in my defense it was around midnight. The Kit on eBay (DEMON EYES) comes with two CCFL tubes and two transformers. I will take photos of them later today. The CCFL tubes are glass and the brightest I have seen. You can make your choice of what Kelvin to do, and for reference sake I went with 8000k.
The first part is to disassemble the front end. I have a brush guard that comes off with six bolts, pretty easy. What I did is take out the top two and loosen the lower four and had the brush guard lean forward, this gave me enough room to work but it would have been easier just to take all the way off. Then comes the Grill that comes out with four to eight bolts and then the center just clips in. So remove the bolts and give her a yank. Once again I just let her rest on the brush guard but it would have been easier to just remove it all together.
Next is the head light housing that needs to come out. Disconnect the Lights from the globe by twisting and pull out. Then pull the whole housing off the truck, once they are out you need to take the globe out of the housing. This is done by three screws, but take note of where each screw is located, which way is up for the housing and globe, and just a reference of how it all goes together. This just makes it easier to put back later.
This is where I suggest but no required to use Latex Gloves from here on out. To help prevent backlighting (The Bulb lighting up the entire globe and washing out the look of a clean
Halo) Take the Bulb and paint the back with black paint. It is pretty easy to tell what side is the back. Whichever side has the wires facing outward is the back. I used a Paint Pen thing. I picked it up at Wal-Mart for I think 3 bucks and it was very easy to use and control the paint. I did the painting while waiting for the globes to heat up and cool down which is explained in the next step.
After the globes are out of the housing it is time to go bake. Each kit might be a little different but it is usually around 215 to 235 degrees for about 15 to 20 min. and if it is not lose by then they go back in for a few more min. When the time is done pull them out with OVEN MITTS and use a flat Screw driver or something similar to pry the clear plastic lens from the Grey globe. Take warning not to just grab and rip off, but to gently pry and twist and move all the way around slowly. Use caution, that if you are not using gloves to watch what you touch for it could leave finger prints. They can be cleaned off but, if they go un-noticed until back in the car not much can be done to fix it.
After the globe is apart and COOLED down you can start the assembly. They supplied the epoxy for me but if your kit does not, it is just a quick set two part epoxy. The Amazing H2 already has a predrilled hole and it is covered with protective latex that the wires just push through. (Thank you AM General) however if this is going in a H3 or something else a hole must be drilled. I think the size was a 3/16" or so, The Kit will specify. Side Note, if you have to drill the hole yourself, Keep in mind where you are drilling. Make sure the wires will clear any impediment in the back and that where the wires exit usually has a 1/4" to 1/2" dark spot. This means drill the top or the bottom of the globe and not off angles.
Once the wires are through the whole make sure the bulb seats the way you like. When it does mix the epoxy and apply it to the back of the bulb and hold in place for about a min. Take your time with the Glue and try not to get it all over the silver globe or all over the front of the bulb. It will leave color differences.
After bulb is dried and in place test fit the clear lens on the globe backing. This will help make sure all fitting is good and that all the old silicone is off the housing and lens. If there is still silicone on Lens or Globe just take a knife or screwdriver and scrape off and then test fit again. Once all is fitting well take the windshield adhesive or silicone, I used Black but it is really not visible, and makes a bead all the way around the globe backing. Place the lens in use vice grips to hold pressure on the lens for about 15 to 20 min. I am sure there are many ways to keep pressure on the globe but this was the best I found.
After they have dried a little it is time to re-assemble all components back into the truck. It is pretty straight forward. Just put back the way it was. Keep in mind to pull the
halo wires through the thick globe housing so as to reach them later.
Wiring is pretty simple. It is all about how you want them. You can have them hooked to your brights, lows, DRL's, or replace any of the three. To have them run together, simply splice into the wires you want or if your want them to replace the lights cut the wire to the lows or DRL's and splice that way. It says not to extend or cut the wires on the transformer but it means only the white wire side or the
Halo side. The positive and negative can be extended. So this is what I did and ran them to my DRLs. It?s all personal preference here. For safety sack I rapped all the wires in Lume, looks good that way too.
You?re done.


 03-25-2008, 05:39 PM


 Posting Rules


 Linear Mode
