I can help you with the buttons, i got them from
http://hummer.autowebaccessories.com
and they are very cheap.
other than that do a good search for the brackets and the lamps make sure that you get a lamp with an amp that the H3 electrical system can handle
How to attach them:
Remove the Ground Wire Fom Batery
Every electrical job should stat here.
Remove the Bezel for Switch Install
Remove the bezel by using the proceedure located in the stereo section of this post.
Installing the Button Switch
Remove one of the button blanks from the bezel and snap thte butto switch into place. I used the left one because the other is my AUX input for the head unit.
Remove the I/P End Cap
Simply pull straigh out and the clips will release.
Remove the E-Brake Lever
Remove the two philips head screws just behind the handle. Slide the handel back and lower it out of the way.
Remove the I/P Trim Panel
Start at the lower right corner and pull out. Work your way around until the panel is free.
The Hood latch
The instructions did not call for it, but I remove the hood latch as well. The handel just clips on so simply depress the tabs on either side and it will pull off.
Connecting the Switch Harness
Locate the black blunt ended wire located straight up from where your right foot usually is. There will be a red one and maybe a blue one as well. The kit comes with these splice connectors but I will be using solder and heat shrink.
Attach the Console Bezel
At this point you can route the switch harness under the the stereo and put the bezel back in place. Again, there is more detail in the stereo section.
Finishing the Switch Harness Install
Rout the orange and white wire from the switch harness over the steering column support and locate the orange, blue, green and black with white stripe blunt wires. The wires can be found straight up from where your left foot normally is.
Finish the Switch Harness Continued
Connect using the supplied splice connectors (or in my case solder) the orange wire from the switch harness to the orange blunt wire. Connect the white wire from the harness to the black with white stripe blunt wire.
Reattach All Interior Panels
Using the supplied tie wraps yo can tie the switch harness to other wire bundles to keep it up and out of the way. At this point you're finished with the interior portion of the install and can reattach the I/P panel and end cap.
The Light Bar Template
This is what the template looks like. I didn't like the way this was going so I removed it, positioned the light bar where I wanted it and marked the holes with a punch.
Marking the Holes
This is how I marked the holes instead of using the template. Center the bar between the pillars and position front to back where you want it. If I could do it over, I might bring it forward another eighth inch or so... but this looks good.
Drilling the holes
Start by drilling 3/32 pliot holes (six each). My knees were a little shaky here. Take it easy so you don't push through the head liner.
Expanding the Holes
Expand the holes to 1/4 inch and then to 9mm with the bit supplied with the kit. By now my knees are trembling and I'm a little more than nervous. I'm actually a little nervous just looking at the picture.
This is a Riv Nut
Never seen one of these before.
This is a Riv Nut Tool.
OK.
Riv Nut Assy
Screw a riv nut onto the tool and apply lubricant to the areas shown in the instructions.
Insert Riv Nut Assy
Hold the lower 1/2 wrench while turning the uper 5/32 wrench to tighten the the riv nut into place. I didn't have a torque wrench for this application, so I tightened it until I saw the sealant squeez out from between the nut and the roof.
Finish the RIV Nut Install
Before you know it, you're a riv nut expert and have all six installed. My knees stoped shaking about here.
Air Inlet Cover
Remove drivers side air inlet cover by pulling straight up. It may take some effort but it will come.
Removing the Pillar
Remove the two phips screws from under the drivers side weatherstrip.
Removing the Pillar Continued
Pull the pillar forward to release the clips and separate the pillar from the weatherstrip.
Notching the Pillar
Put a notch in the pillar for the wires. I came in about a 1/2" and used a rat tail file for a clean look.
Route the Wires
Lay the light bar in place loosely and route the wires as shown.
Continue the Routing
Route the harness as shown and tie down with suppied tie wraps. Secure the light bar at this point using the supplied six torx head screws with a T-25 torx wrench. Also reattach the pillar.
Attach the Relay
Attach the relay to the firewall using existing stud and palnut supplied with kit.
Another View of the Relay
Connecting Harness Wires
Locate the six blunt wires located behind the drivers side whell well. Tough place to get a good picture. Splice or solder one of the black blunt wires to the black harness wire. Splice or solder orange blunt wire to orange harness wire. Splice or solder black with white stripe wire to white harness wire.
Accessing the Fuse Box (BEC)
Remove batery vent tube (uper left of Picture) and remove the BEC cover. Push on the bottom part of the clips that hold the cover on.
View of BEC cover
Removing BEC
Remove all attached wires from BEC.
Remove the BEC Continued
Pinch the release clips on both sides and pull straight up using the handles located to the outside next to the clips.
The BEC Void
Finishing the Harness Install
Attach the very end of the light bar harness to the receiving connector on the under side of the BEC.
Reattach the BEC
Reattach the BEC making sure the light bar harness does not get pinched and install the included 20 amp fuse. This is the yellow one in the lower left of the picture. Replace the BEC cover and you're basically done.
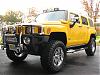
Finished Product
I really like the unique look this gives to the H3.
Lights On
If the drivers side light looks brighter, thats because it is. I need to check this out.
If you need photos for instructions to be clear PM your email.

 06-30-2007, 03:50 AM


 Posting Rules


 Linear Mode
